DIY microwavable hot pack

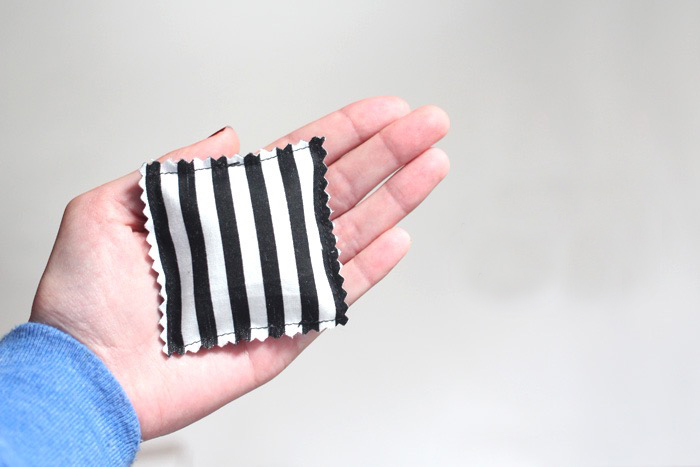
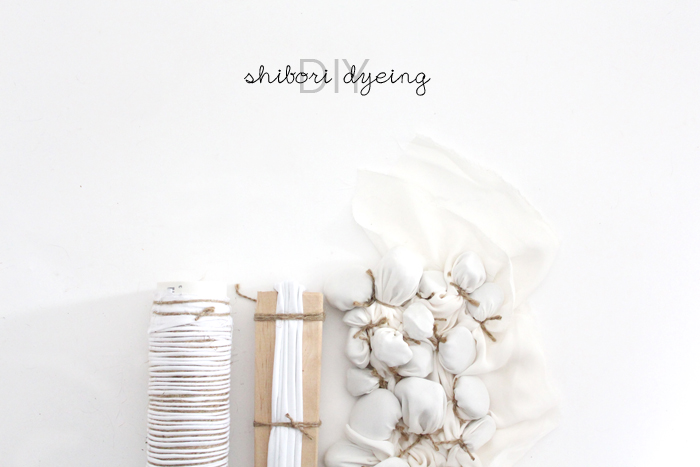
Hey everyone! Today I’m going to share a DIY project that I’ve been making for years now, and use aaaaaall the time. Like, almost every day, really. They’re reusable, microwaveable hot packs!

For the last couple years, I’ve been dealing with all sorts aches and pains. While we are still trying to figure out exactly what is going on with me medically, we do know there is some autoimmune component. With that, comes a lot of joint pain, all over body aches, and even some random but intense abdominal pains. So you can often find me with one or more of these hot packs on me somewhere when I’m lounging at home. I find them very comforting! And I also use them for menstrual cramps, as well as tension headaches (cold compress on my forehead and a hot pack on the back of my neck at the same time always seems to help!).

All this to say, these things come in handy for all sorts of things. And they would be great gifts for anyone! I personally like to make mine long and thinner, so that they can be draped around my neck, but also draped across my legs or abdomen, too. You can make it any shape you want. I’ve also made big square ones in the past, which is good for covering your back!

Supplies:

  • cotton fabric

  • matching thread

  • sewing machine

  • rice

  • funnel or small pitcher or something for easy pouring

  • Marking tool (tailors chalk, water soluble marker, etc)

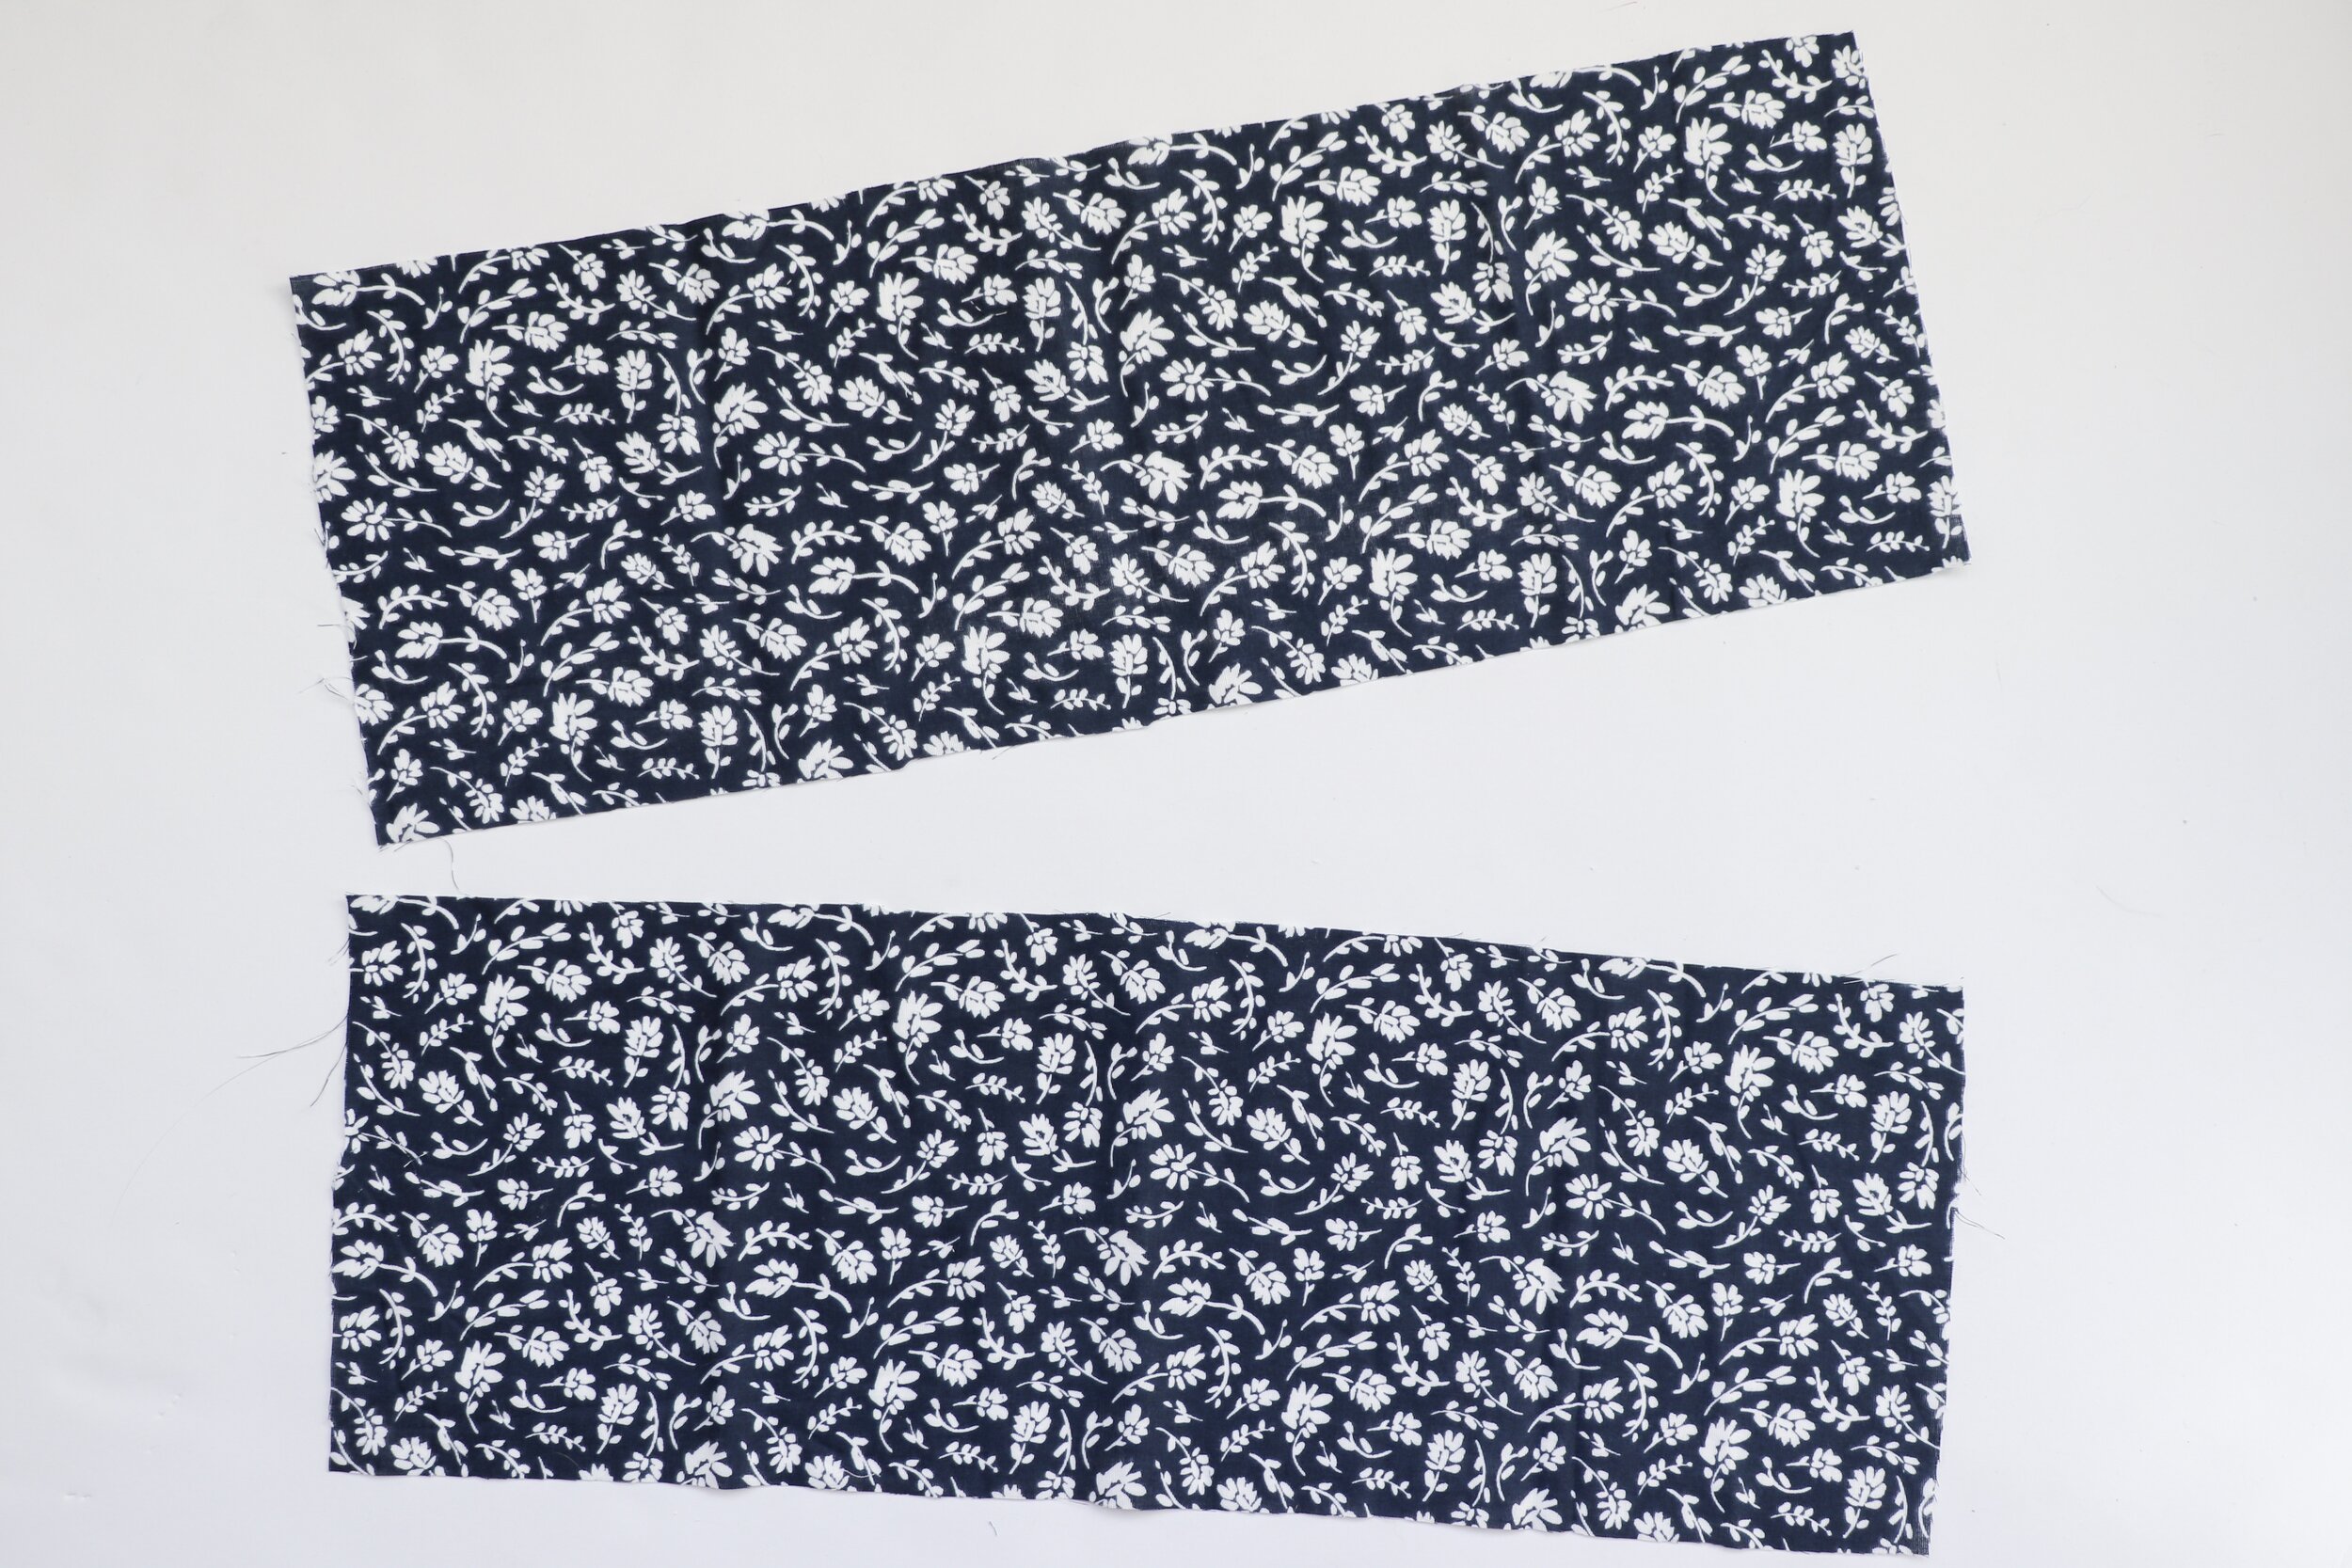
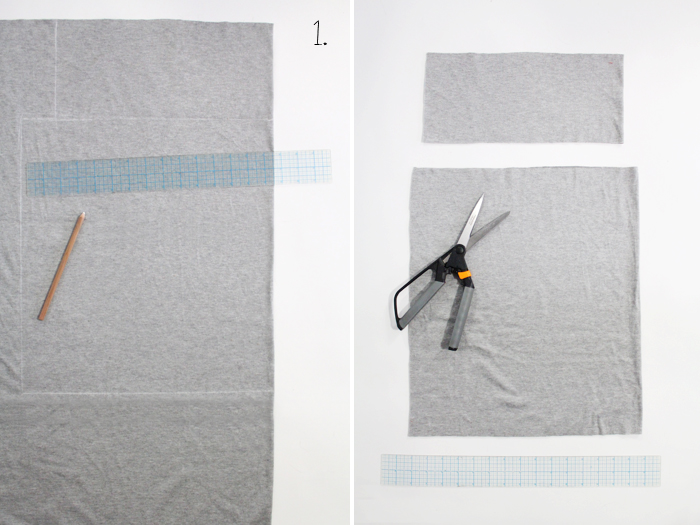
Start by cutting 2 rectangular pieces of fabric aprox. 21.5” x 7.5”. This is the shape I use because I like it long to go around my neck, but you can make any size or shape rectangle you like.

Place the two pieces of fabric together with right sides together.

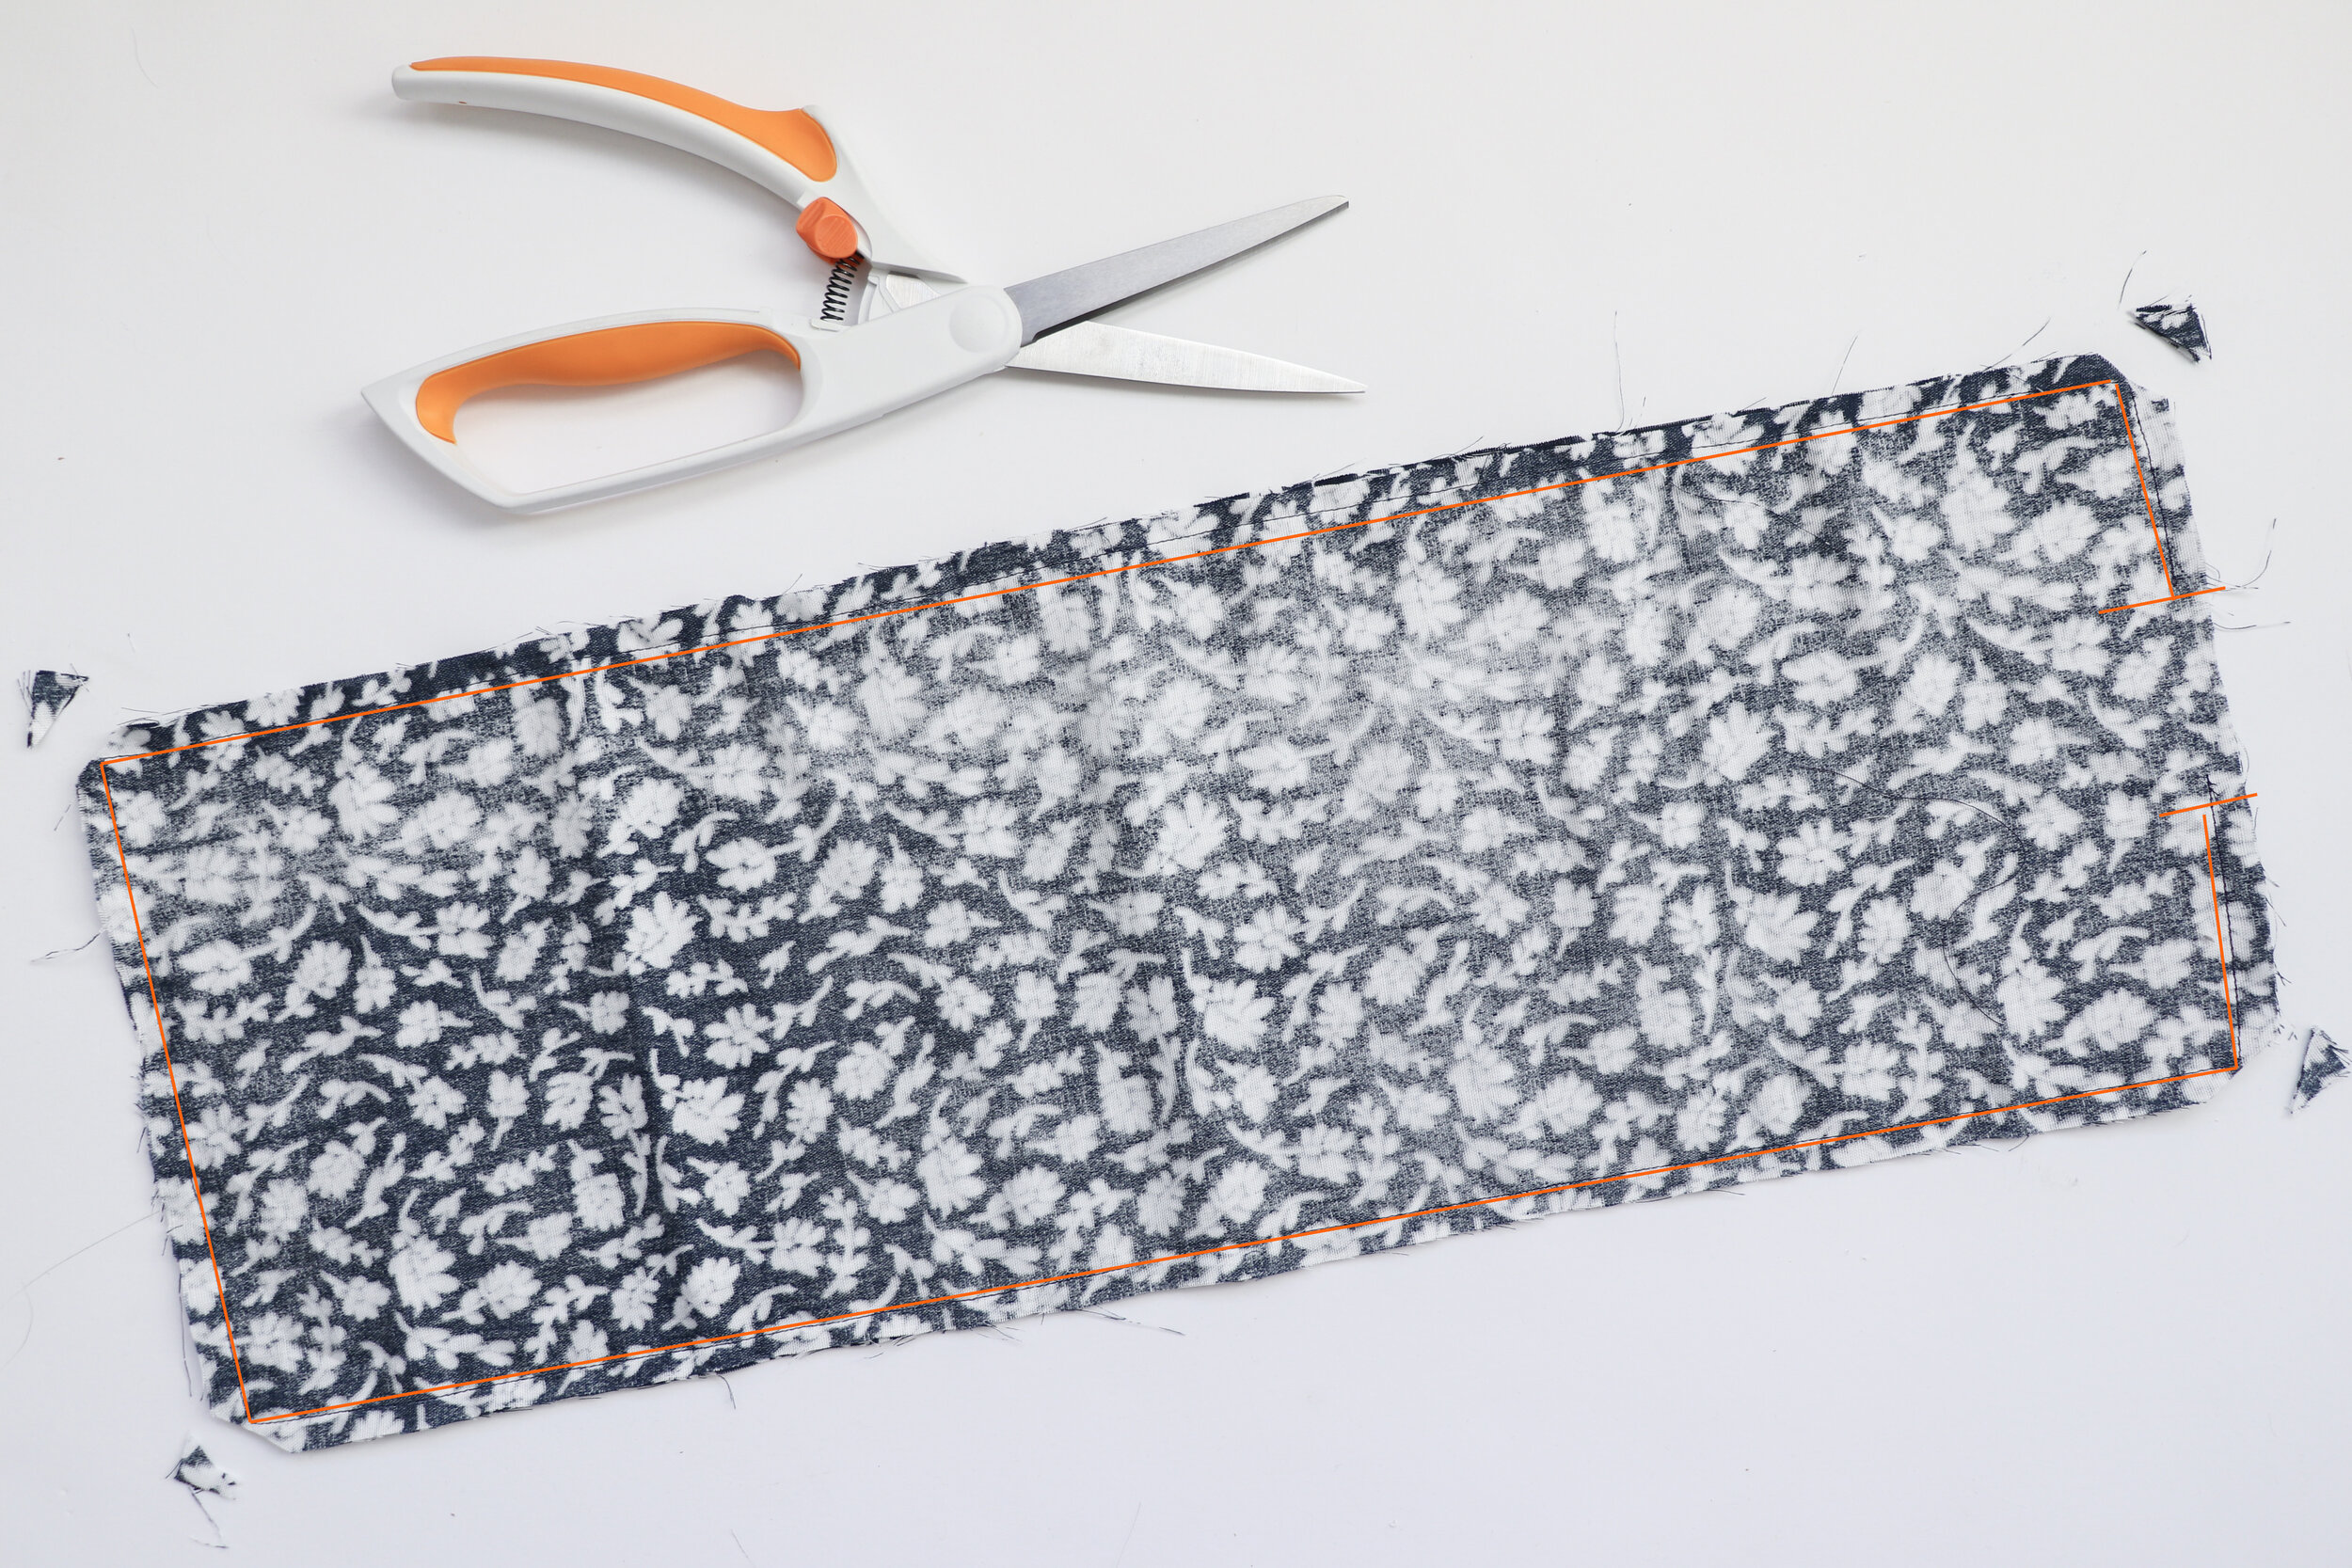
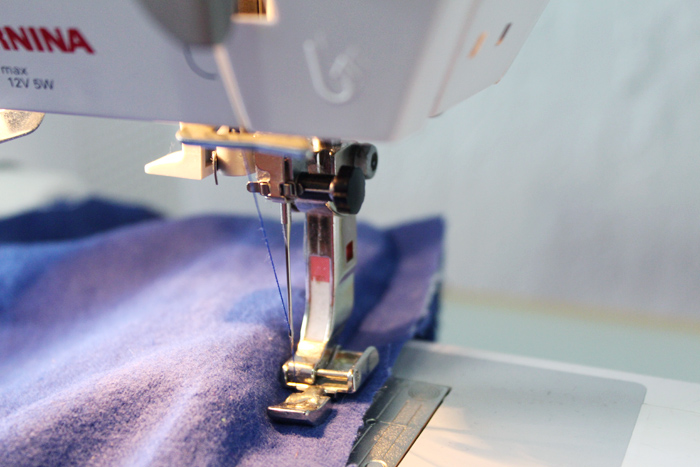
Sew together around the outer edge, 1/2” away from the raw edge, leaving a 1-2” opening at one of the short ends.

clip the corners.

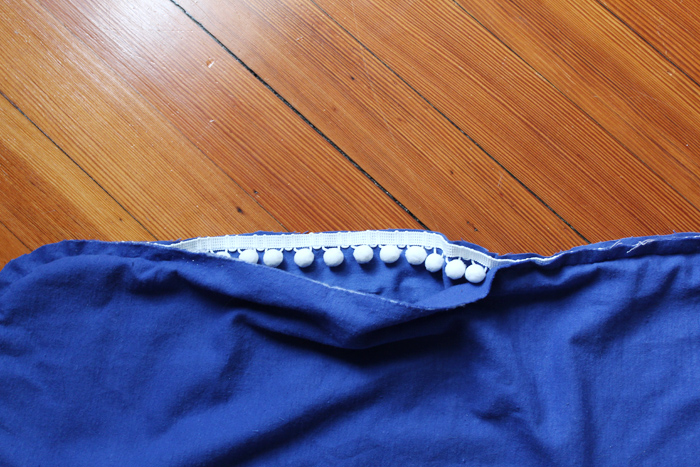
Turn right side out through the opening that you left. Use a point turner or other tool get those corners lookin good. Press well.

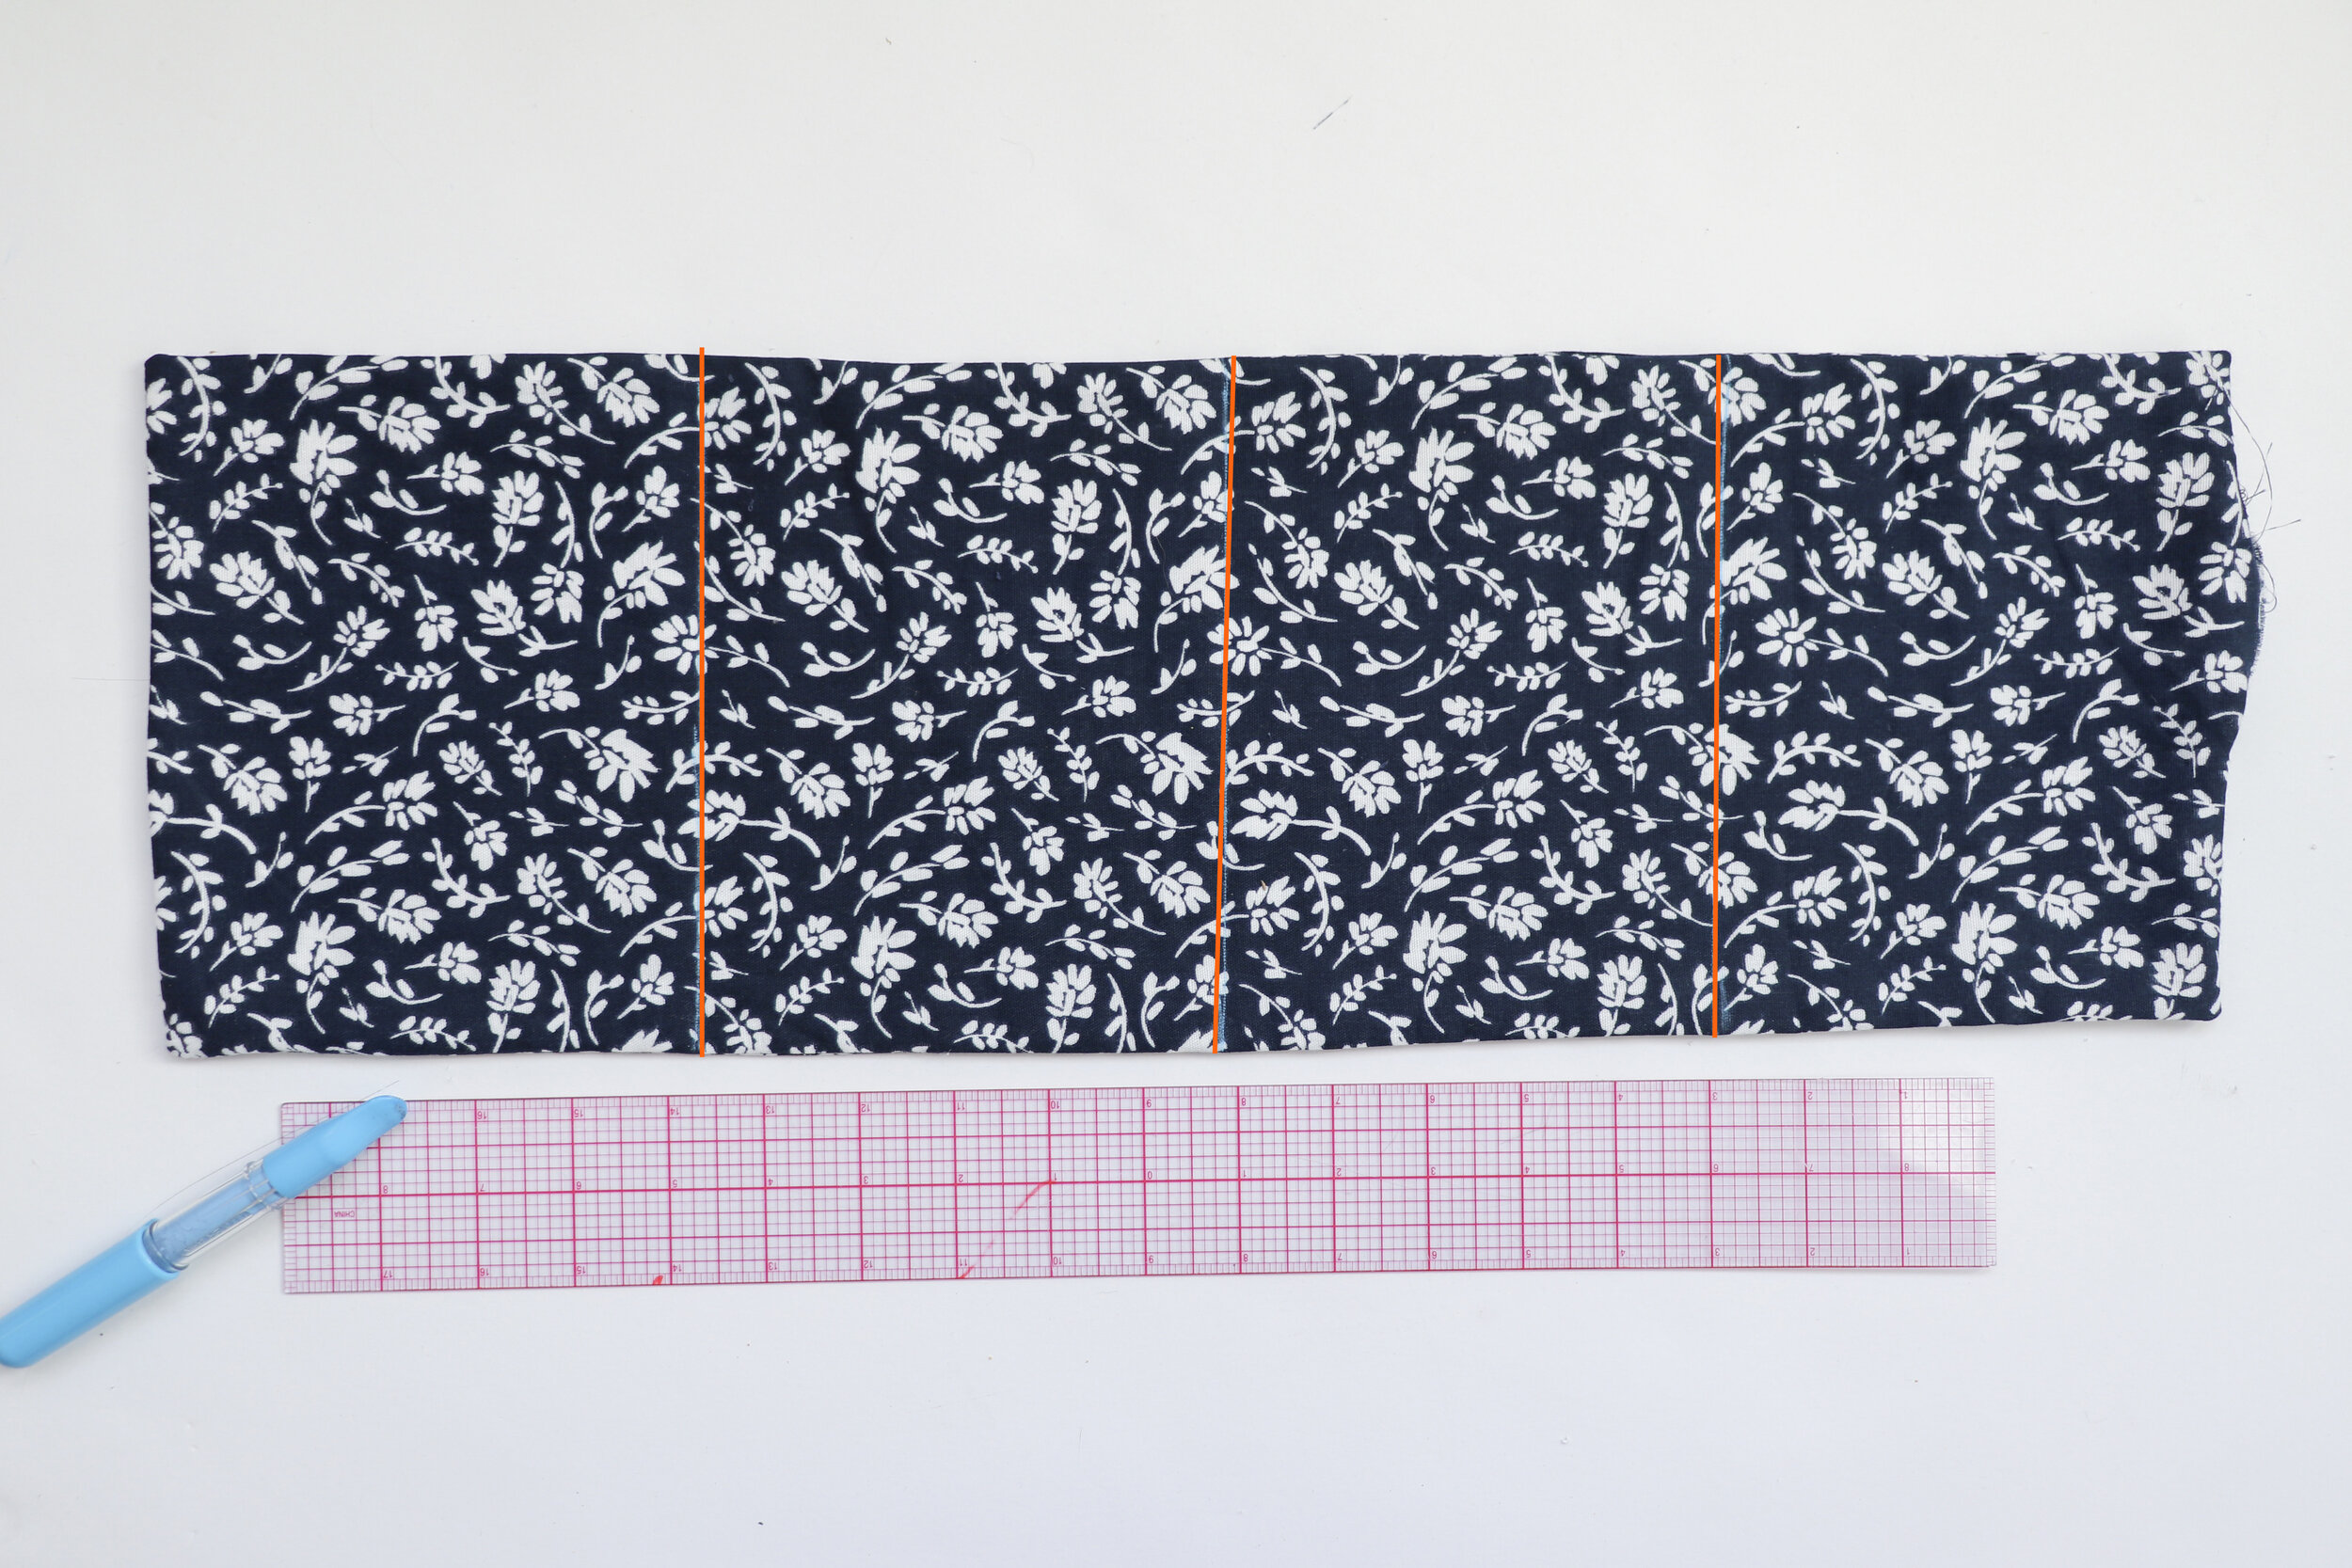
Using a ruler divide the long edge into 4 equal sections, marking them right on the fabric. You can use tailors chalk, water soluble markers, etc.

Get your rice ready! I started out using a funnel to get the rice into the fabric, but I found that the hole of the funnel was too small for the rice to pass through quickly enough, so you will see in the next photos that I switched to a small pitcher to pour it in instead.

Start pouring your rice in through the opening you left at the short end! Do a little at a time, until you have a feeling for how much you need.

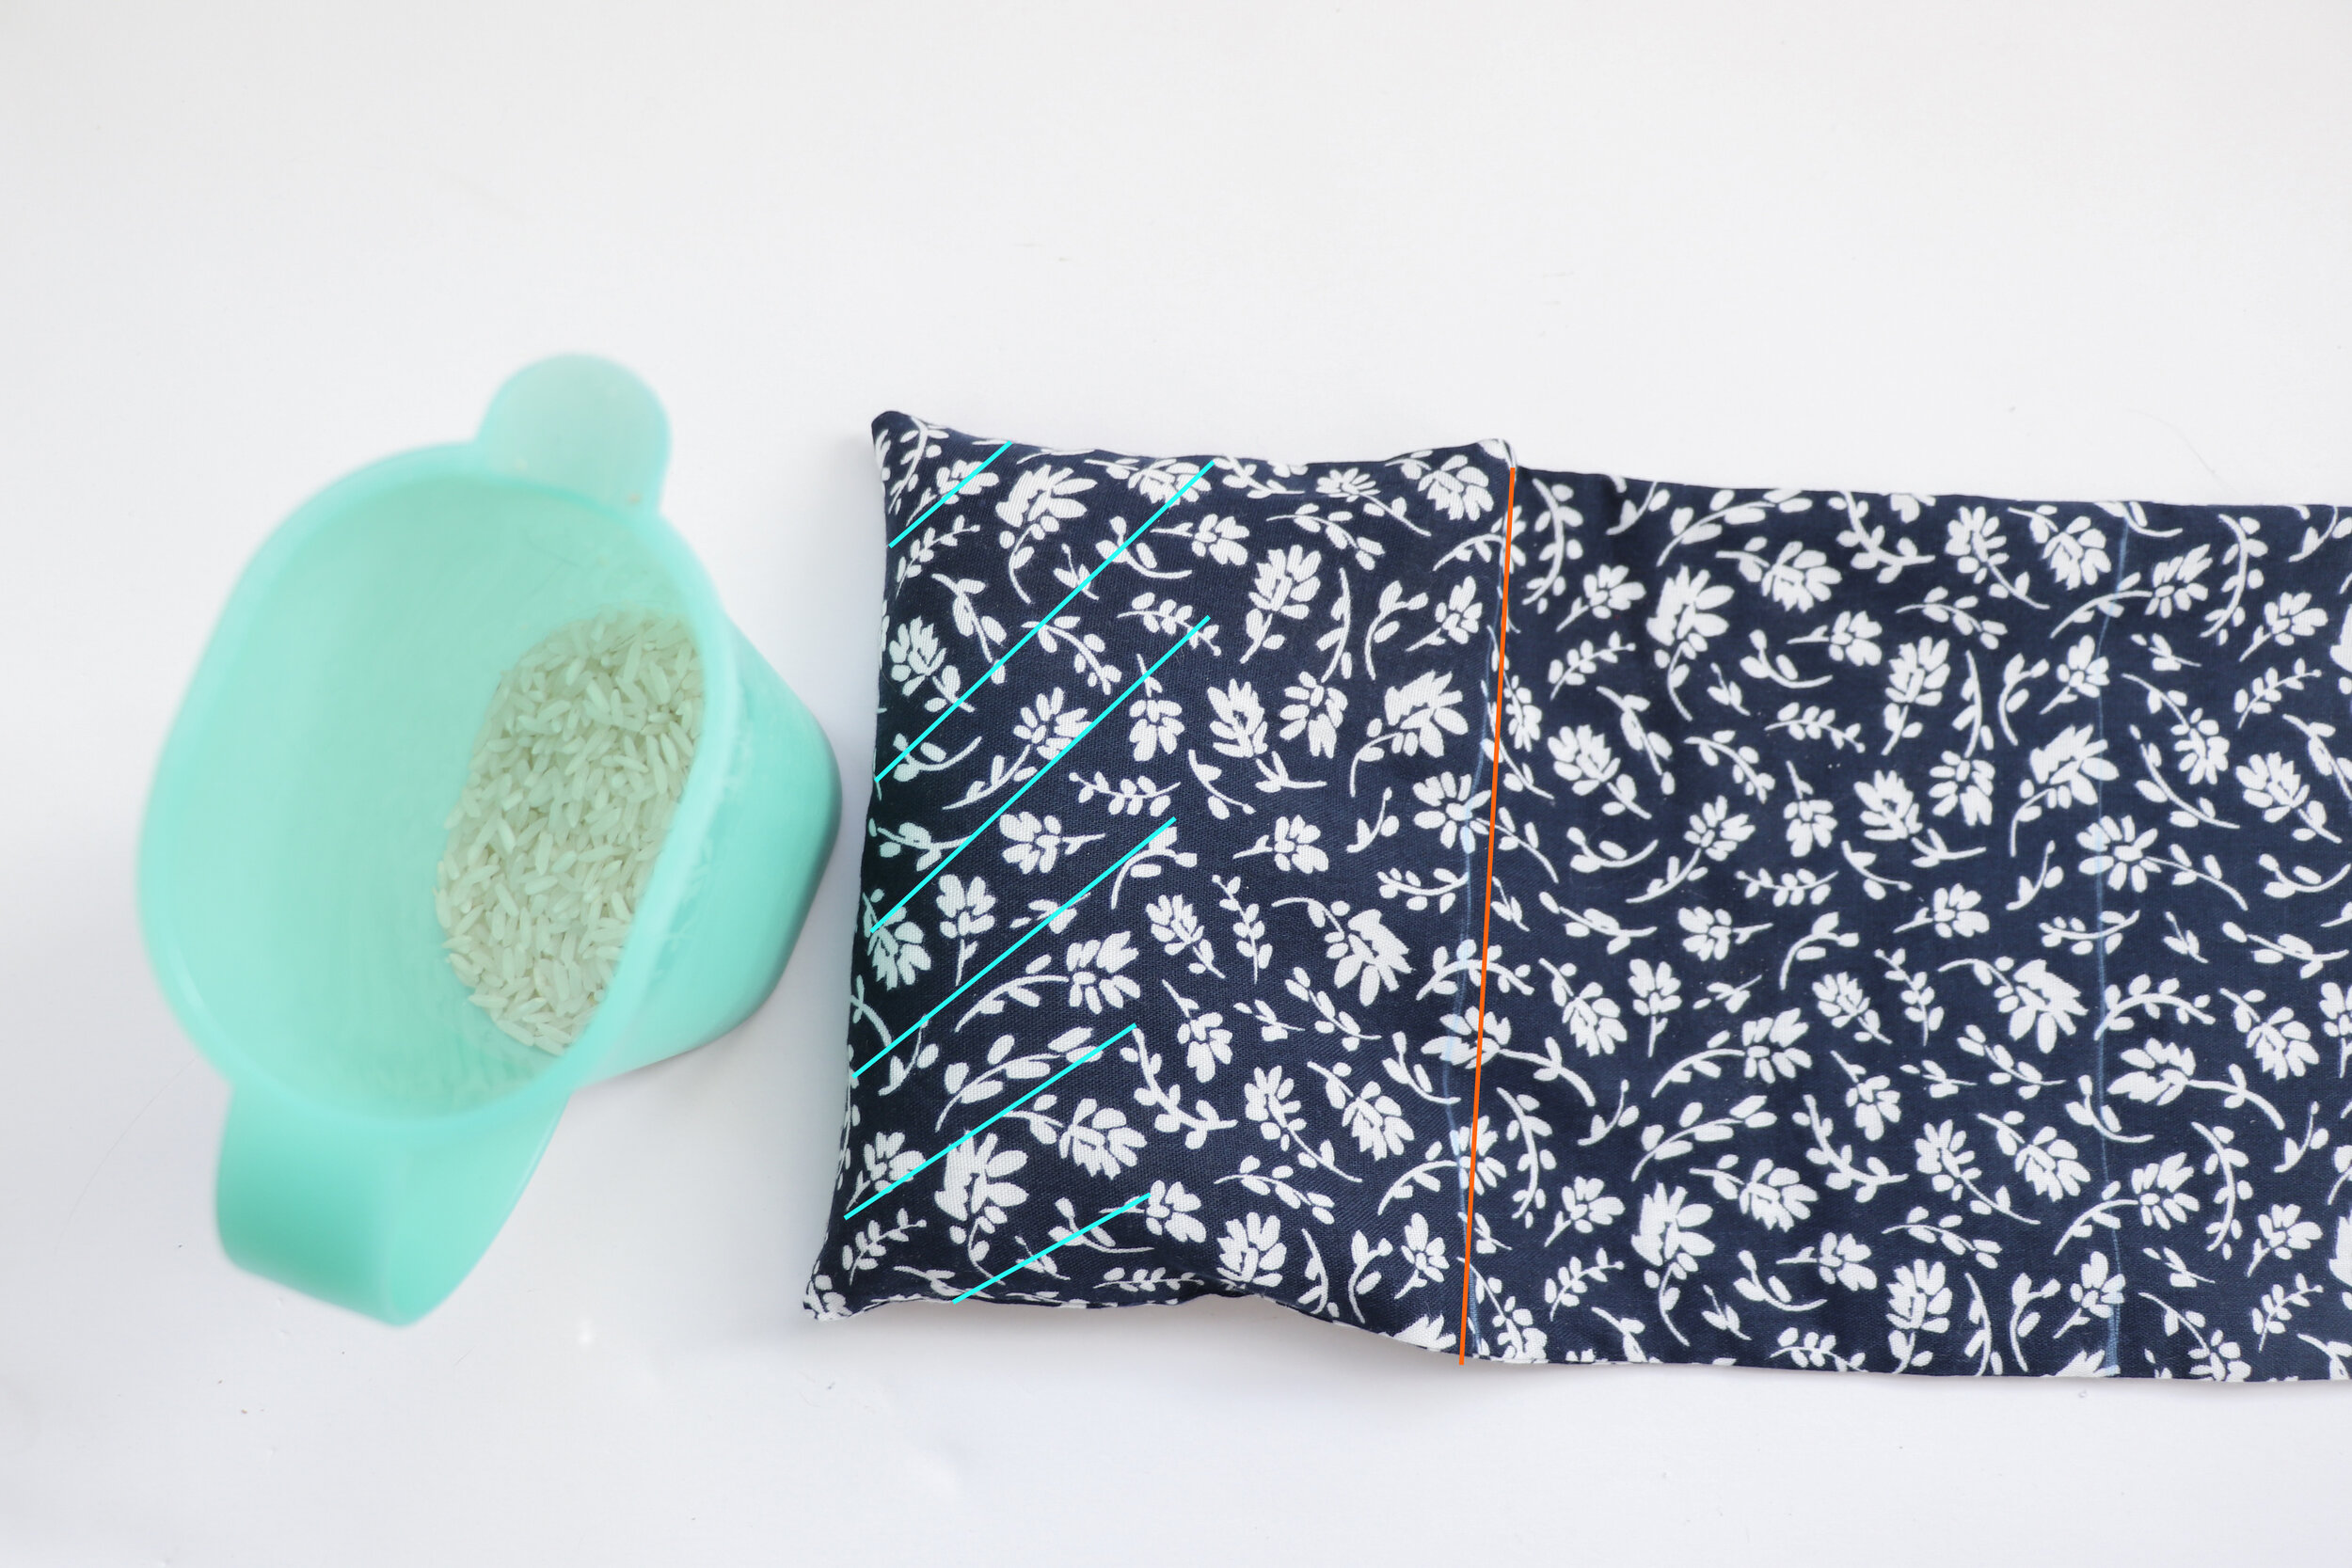
Pour enough rice in so it fills about halfway up the first section you have marked. You don’t really want to add more than that, or it will be overfilled and uncomfortable.

Then carefully sew a straight line across that first line you marked, to close off that first section you just filled. go slowly, making sure to keep the rice in that first section.

Nice the first section is closed off, pour in more rice to, again, fill in the second section halfway full. And again, sew it closed along that second line you drew.

repeat this process with the third and fourth sections.

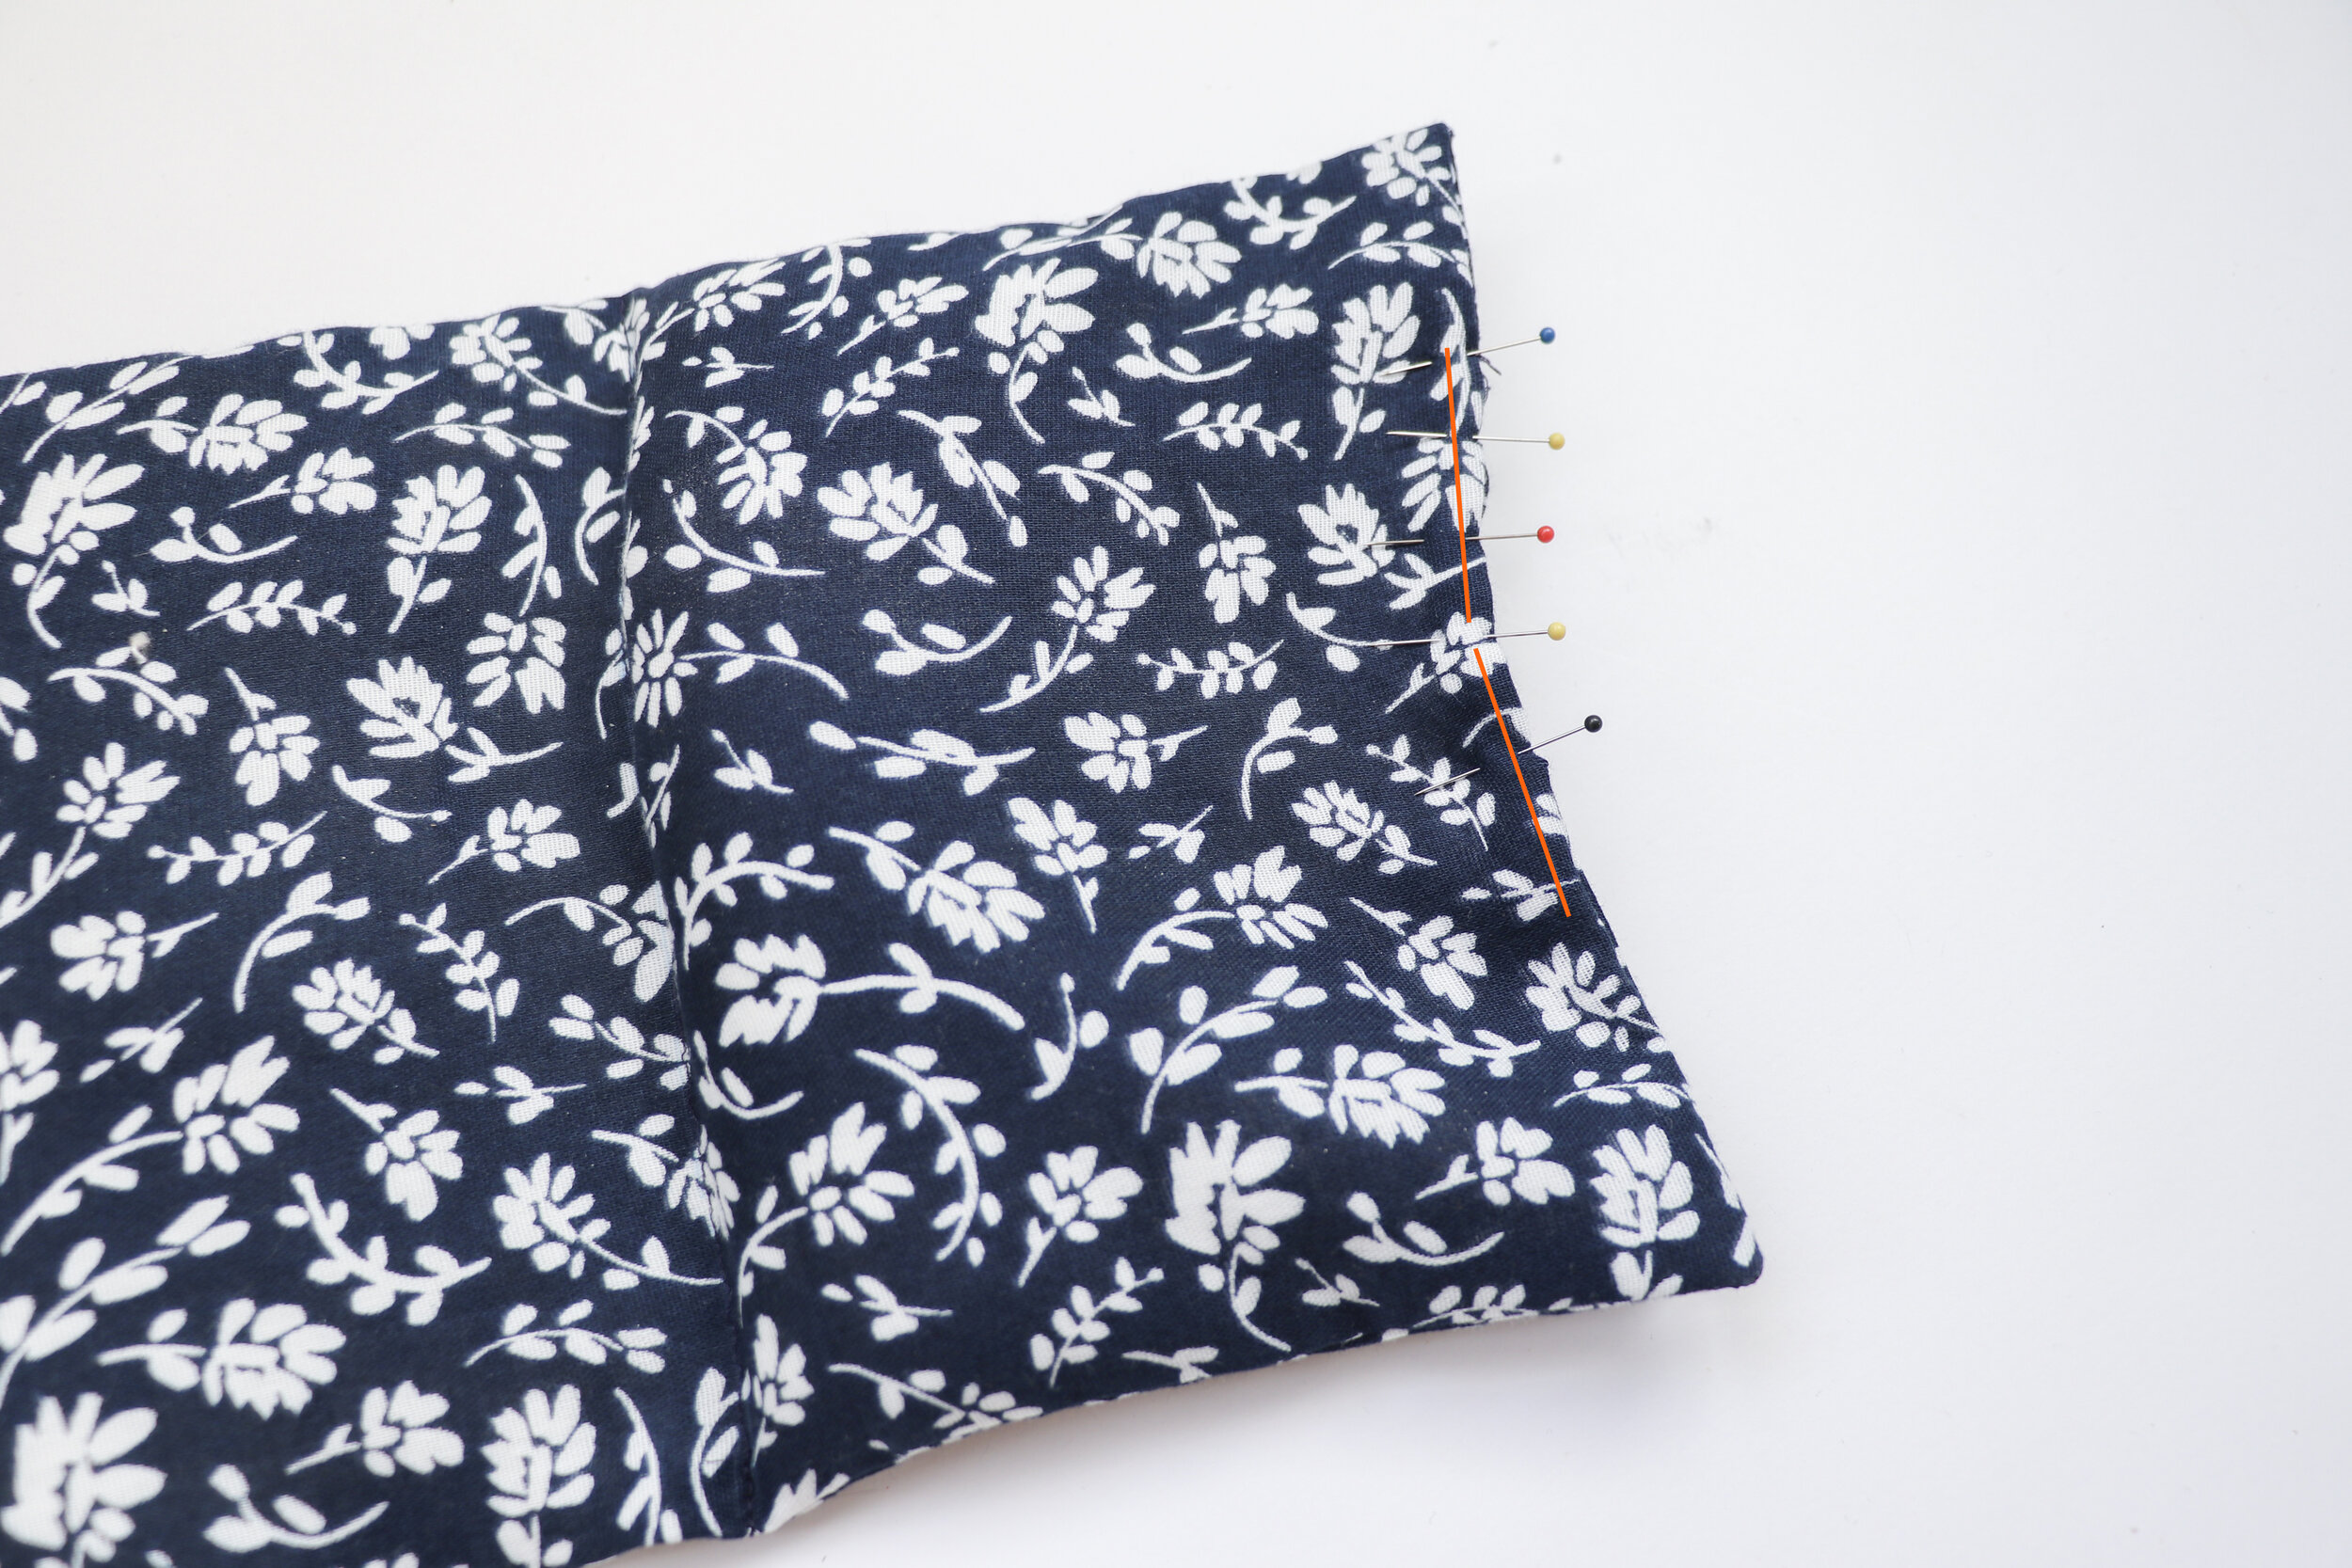
When you have filled the fourth and final section halfway with rice, stitch your small opening closed by sewing close to the edge, about 1/8” away from the edge. Make sure to backstich well to ensure that stitching stays closed and rice doesn’t fall out!

That’s it! Now you can place the hot pack in the microwave for 2-3 minutes to heat it up whenever you need it!

oh, and you’ll probably need to clean up all that rice you spilled, if you’re anything like me 😂.

DIY no-sew Mickey Mouse ears

We’re heading back to Disney World in a few days, and I whipped up this quick DIY for Penny for the occasion! She has her classic Mickey ears hat with her name embroidered on it that we got last year, and she will be wearing it to Magic Kingdom again. But I wanted to have something different and special for her to wear specifically to Animal Kingdom on this trip, and I didn’t want to pay a ridiculous amount of $$ for a specialty headband she’ll only wear to one park. So I made my own! And for less than $8.

This is a super quick and easy Mickey ears headband. Nothing fancy. Won’t look as expensive and nice as the store bought ones. But it gets the job done. No sewing required. Just a little hot glue.

You can make them animal print like I did, basic black, or any color or pattern you want. Good for if you want ears for the park but your on a budget, or you could make a bunch as favors for a Mickey themed party!

S U P P L I E S :

  • stiff craft felt or thicker craft foam (you can use floppy felt or thinner material, but you’ll need another layer in between to keep the ears upright, like cardboard or stuffing. I used the stiffer craft felt because it was sturdy enough to stay standing up without anything else. I got this giraffe print one at Hobby Lobby . you could also use fabric, but again would need a filler and would require sewing. A different tutorial all together).

  • basic, thin headband

  • hot glue gun

  • scissors

  • optional: small fake flowers (could also use a fabric bow for Minnie ears, or anything else decorative you could think of)

Decide how big you want your ears. If you find a round household object thats the perfect size, you can use it to trace the perfect circle on a piece of paper.

But don’t draw a complete circle! Leave an opening about 2” wide at the bottom, and draw tiny 1/4” straight lines at the edges of the opening

Fold your felt in half, and trace your open circle pattern on the fold, twice.

Cut each one out.

Since you cut on the fold, you will now have two peanut shapes.

Find your perfect placement for your first ear, and lightly mark it on the headband (I used chalk).

Add a line of hot glue right in the middle of the peanut shape.

Stick the line of glue along the bottom of the headband, making sure you are lined up with your placement markings from before. Press and hold until glue cooled/dried and sticking.

Now glue around the entire circular edge of one ear/peanut half.

Fold the ear in half, being careful to line up the edges. Press and hold until glue is dried and they are stuck together.

Ta-da! one ear done! Carefully trim around the edge if there are any spots that didn’t line up perfectly, or if there is any glue strings hanging out.

Repeat for the second ear.

Now its time to decorate! If you are adding florals like I did - pull some of the fake flowers off of their stems.

Trim off the green stub from the back, so that the flower is as flat as possible in the back. Add a bit of hot glue right in the middle.

Stick your flowers to your headband however you desire!

I hid the visible glue spots in the back of the headband by pulling some of the flower petals down over them. Easy-peasy! If you are using flowers that can’t do that, or if you are putting a bow or something else on, You could glue a thin ribbon on top to cover up the hot glue and imperfections.

DIY Shaving Cream Marbling

It's been so long since I've shared a DIY with you guys! I really love this one, and I've done it in the past (although I'm still perfecting it, as you'll see!) I'm going to show you how to paint a marbling effect with shaving cream. I'll show you how to use fabric paint and fabric so you can create all sorts of cute little sewing projects. But note that you don't necessarily need to do this on fabric. If you use regular craft acrylic paint, this could work on a sturdy paper or canvas, or any other surface you want to try. I would think its the same process, though!

Supplies:

  • shaving cream
  • baking pan/cookie sheet
  • white fabric ( try to stick with a natural fiber like cotton) 
  • fabric paint (if you can't find fabric paint in colors you like, you can mix acrylic paint and a fabric paint medium to make it more flexible for fabric)
  • a straight edge, like a ruler
  • large plastic or garbage bag underneath everything to contain the mess

Squirt a bunch of shaving cream onto your cookie sheet and smooth it out. You can use a toll or something to smooth out the cream, but i just use my hand. It's fun to get messy, and it smells so good!

Squirt on you on your fabric paint whichever way you want. Streaks, squiggles, small blobs. Just avoid large blobs of paint. Layer on your colors and have fun with it. 

(So I actually did this next step two ways because I wasn't happy with the first go round. But I'm going to show you it anyway and the result, in case you DO like how it looks.)

It's time to swirl . For this first one, I used a skewer stick (a toothpick or something else small would work too) to create small swirls. Swirl lightly just on top of the shaving cream, you don't need to dig into the cream.  

After this, I added a few more squirts of red and orange and swirled a little more. I'm going to jump ahead a couple of steps to show you the finial result from doing it this way:

This is what it looked like from using a stick to create small swirls. Not really what I was going for, so I tried a different swirling method you'll see below. But by all means, if you like this look, go for small swirls!

Ok, so I started over with my shaving cream. I squirted on my paint, and then swirled with my fingers and hand. VERY gently, and just on the surface of the shaving cream. If you mix too much, you'll just end up with a muddled mess. 

Carefully lay your fabric down on top of the shaving cream. Gently pat and rub the fabric to transfer the paint. Don't push too hard or rub too hard. Or, again, you'll get a muddled mess. 

Gently pull back the fabric off of the shaving cream. 

Lay the fabric down flat with painted side up. It's going to look messy because there is a lot of excess shaving cream sticking to it. 

This step is probably the most difficult part. I've done this painting process a few times in the past, and this is the part that I tend to mess up on and cause me to start over. So just note that you may have to try the whole thing a few times to get it right. Have plenty of supplies on hand to do a few versions. 

You need to use your straight edge to veeery gently and softly scrape off the excess shaving cream. I do this in small sections, because the cream will build up on the straight edge. So I do small sections, and wipe it off in between. Be VERY gentle with a soft hand. If you press too hard, you'll smear the paint and end up with straight edge paint lines.

** As you can see, this DIY is all about being very gentle and soft handed. **

You don't have to get every last bit of shaving cream though. You'll be washing it later, so the rest of it will come off. Just try to get the majority of it. 

I had a larger piece of fabric, so I repeated everything a second time to cover the rest of it. And this was my result! Not exactly perfect, but I'm pretty happy with the way it came out. 

Let the paint completely dry on your fabric. And go ahead and clean everything else up!

Once the paint is completely dry, hand wash it really well. 

Ring out, let dry, and press if needed. If you do press it, iron it from the wrong (non painted) side, or use a pressing cloth. Don't press right on top of the paint. 

That's it! Now you can do whatever you'd like with your fabric. I turned in the edges and stitched to create a cute little hand towel for Penny's play kitchen. In the past, I cut out pieces for eye masks, and even did it on cotton canvas to create zipper pouches. Sky's the limit! If you have the patience, you could repeat all over a large yardage of fabric to make larger items. 

DIY Roundup

Remember when I used to do DIYs her all the time? I've been thinking about starting back up posting some again. I mean, don't get to excited, it will only be once in awhile HA. But it's something I want to try again. 

So I thought I'd I do a little round-up of some of my past favorites! I'll link every one to their original post. 

DIY Cat Eye Mask

I was so proud of this one! I loved making them so much, I even started making them to sell in my Etsy shop. Since Nelly Lou has started to take a different direction, I'll no longer be offering them for sale. So now is the time to re-visit the DIY and make one for yourself! 

DIY Game Board Beach Blanket

Zach and I used to use this blanket all the time at the beach! I'm thinking I might eventually make a larger circle one with a more toddler/small child friendly game. I'm not sure what that game would be though, so if you have any suggestions let me know!

DIY Simple Knit Bodycon Skirt

I've made a lot of these. I mean, this one pictured and the one in the DIY are both way too short for my lifestyle now, ha. But it can be made in whatever length you'd like. 


DIY Shibori Dyeing

This one was a hit and one of my all time favorites! I used the left fabric in this dress, but this could also be used for pillows, tea towels, etc. 

DIY Hand Warmers

An easy DIY for those colder months. Stick em in your pockets and then put your hands in there and you'll be toast warm!

DIY Off The Shoulder Dress

I actually did this DIY post for Megan Nielsen and it was a HUGE hit. It's an easy garment to make because its just a few rectangles, no actual pattern required. You can check it out over at Design Diary. 

DIY Transparent Clutch

Kind of a random one and not for everyone, but I think it turned out pretty cute! Good for heading to a stadium that only allows clear purses. 

DIY Passport Cover

This is a real oldie, and the post isn't formatted for my current blog format. But I remember a lot of people liking this one at the time, so I wanted to include it!


Those are some of my favorites! You can find some more in the DIY category on the left. 


I MAKE FASHION

Remember when I teamed up with Megan Nielsen awhile back and I was doing all those fun sewing tutorial posts? Well did you guys know that I'm back at it, contributing to Design Diary again? I've already shared some technique tutorials, like inserting an exposed zipper, gathering heavy fabrics, and working with PDF patterns. But today I've posted a fun DIY for the off the shoulder dress that I wore in this post. And now I have a really chic chambray version too! If you're a sewer (or even if you're not and just want to give it a try. I swear it's pretty easy), head on over to see how you can make one of your own. 

DIY GAME BOARD BLANKET

gameboard1

Boo and I love going to the beach. Year round, actually. And heres the thing - as much as I love it, I get antsy sometimes. Boo naps. Like, that’s his favorite thing to do. He hits the sand and he’s out. I need to be doing something, though. I’ve tried bringing a book. But for some reason, I just can’t read on the beach. I get distracted, and still, antsy. I know, I’m weird. Isn’t that like the number one beach activity?!

So I saw this DIY a while back for a portable checkers board made on a placemat, and I thought - why not make it on a bigger scale and put it on a blanket? That way, it’s double duty! Triple duty, actually. Its a game board, its something to sit on, and it’s something to cover up with. And while we’re at it, let’s make it double sided, too. 

gameboard3
gameboard2

\

I decided to go with a checkers board on one side, and a mancala board on the other. I’m not very good a checkers, by the way. But mancala? Mancala is my jam. 

gameboard4

The best part about it? You don’t have to carry around all the little game pieces. Just pick up shells or rocks or anything around you and use those as your game pieces. 

gameboard5
gameboard6
gameboard7

And it doesn’t just have to be for the beach! It would make a perfect picnic blanket. Or just for taking to the park, or your own backyard, and enjoying some fun out in the sun. 

So, read on after the jump to see how I made it!

gameboard8

Supplies: 

- a couple of yards of fabric (I used a lightweight, soft cotton flannel)

- fabric paint and brush

- scissors

- ruler

- white pencil or chalk

- pom pom trim

- sewing machine / needle and thread

gameboard9

1. Cut two big squares of fabric. As big as your fabric is wide. My flannel was 42” wide, so I ended up with 42” squares. 

2. Using tailors chalk or chalk or a white pencil, draw out your game boards. Don’t worry, any extra markings should eventually rub out. Or just wipe them off with a little water.

Your measurements will all depend on how big your fabric is, and how big you want your game boards to be. But here is how mine measured out…

Checkers:

- draw a 18” square in the middle of your fabric. Divide into  a 2 1/2” grid. there should be 8 squares on each side. 

Mancala:

- draw a 7x27” rectangle in the middle  of your blanket. Split right down the middle the long way, and then every 4 1/2” going the short way. That will leave your with two sides of 6 blocks.

- On either end, leave a 2” gap and draw 7x3 1/2” boxes. 

gameboard10

3. Get to painting! Try to keep your lines nice and straight, using a flat edge brush to help. You’ll probably need to do two coats. 

Oh! Don’t forget to put something underneath your fabric. It WILL leak through.

gameboard11

4. Once your paint is dry, place your two fabric pieces with right sides together. Line them up perfectly. I then cut and curved each of my corners just to make it easier to add the trim. 

gameboard12

5. Place your trim along the edge, pompoms towards the inside, and sandwiched in-between the two fabric pieces. Pin in place. 

gameboard13

6. Time to sew! It would be best use a presser foot that allows you to get right up close to pom poms, like a zipper foot or something similar. You want to be as close as possible so none of the thick white strip of the trim is popping out in the end. 

gameboard14

7. Sew almost all the way around, leaving a good sized gap. Make sure the backstitch at each end. If you want to baste down that last bit of trim to one side, you can do that now. 

Turn your blanket right side out through the gap that your left. Finish it up by closing the gap with an invisible hand stitch. 

gameboard15

Take your new blanket to the beach, or on a picnic, or to your backyard! Find some rocks or seashells, and have fun :)

gameboard16

DIY TRANSPARENT CLUTCH

pvc1

Geez, guys. I’ve been wanting one of these babies for awhile now. I actually bought some vinyl months ago. But you know, life. Better late than never, though! I’m actually thinking about doing one with white machine stitching too, for an almost completely transparent look. But for this one, I decided to start with a bolder, brighter look.  

See how to make it after the jump, and don’t forget to check out how I styled it in yesterday’s post!

pvc2
pvc3

1. Cut your piece of pvc. Start with a 12x14 1/2” rectangle, and then add your triangular top, with the peak being 5” tall. 

pvc4

2. Fold the pvc up into the envelope shape, making sure to leave 1/2” at the top. My vinyl stuck to itself when I folded it over, but if it doesn’t, you could use a thin strip of clear-drying glue to hold it together. 

3. Use an awl or something pointy to mark where you want to stitch. I went with 1/4” in from the edge, 1/2” apart. 

pvc5

4. Cut a reeeeeeally long piece of embroidery thread and thread your needle. Knot the end. Start your stitching from the inside of the clutch, so that your know is hidden. 

If you know some really neat edge stitches, by all means, be creative! After playing around with a few things, I decided to stick with a basic over under technique for a zig zag look. 

pvc6

5. Work your way around the entire edge, finishing by bringing it back inside the clutch and knotting it. 

pvc7

6. It’s time to mark your placement for your button stud. Place a small piece of cardboard, or something like it, inside. You only want to punch a whole in the first two layers - the flap and the front. 

pvc8

7. On the front, make your hole a little bigger by pushing the awl through farther. Place the screw threw the hole from underneath, and screw the button top on. 

pvc9

8. Make the hole on the flap just a tiny bit bigger by clipping it with a pair of scissors or exact knife. 

pvc10

9. Done! Fill your clutch with all your goodies (what you want seen, at least).

P.S - see that little pink pouch? It’s a business card  holder, and they’ll be coming to the shop soon!

image

DIY SHIBORI DYEING

shibori1

In college, I took a fabric arts class where we did a lot of dyeing, stamping, and painting techniques. That is where I did my first Shibori dyeing, and absolutely loved the results. I’ve been dying (pun intended) to try it again ever since (um, 6 years?!). 

So, if you don’t know, Shibori is a Japanese form of resistance dyeing. It involves folding, wrapping, binding, twisting, stitching…. anything to provide resistance to create patterns with the dye. There are soooooo many different methods, and different looks you can create, but I decided to show you the 3 most common ones. Read on below to see how you can do it!

supplies:

-fabric dye (liquid or powder)

-fabric

-bins or buckets

-plastic

-rubber gloves

-string or rubber bands

- 2 long planks of wood

-dowel or pvc pipe

-rocks

shibori2

METHOD 1

accordion fold your fabric. Place between your two long pieces of wood and hold in place with rubber bands or string. Make sure they’re reeeeeally tight. The rubber bands / string act as resistance for the dye, so how many you use will give different design results in the end. It’s up to you!

shibori3

METHOD 2

Method two is a pole wrapping technique. PVC piping is probably the easiest tool to use, but you could use and cylindrical object.

Wrap your fabric (you can do it vertically or diagonally) around the pole and hold it nice and tight. Tie a a piece of string around the top, and continue to tightly wrap down the fabric and pole. When you reach the end, knot it off. Now push and scrunch the fabric up towards the top as much as you can. Again, the tighter the compression, the better. 

shibori4

METHOD 3

The last method involves binding objects. The most common object used is rocks, but you can use large beads, marbles, etc.  

Place each object under the fabric and bind tightly with string or rubber bands. Place each rock as close or as far apart as you’d like. Do it in one section, or cover your entire piece of fabric, like I did!

shibori5
shibori6

Place plastic down everywhere you are going to be dyeing. This is very important! Cover more than you think you need to, just to be safe. You don’t want to accidentally stain anything :|. And wear rubber gloves when handling the dye!

Prepare your dye in your bins or buckets according to the provided directions. You can add salt for cotton fabrics, or vinegar for silks, wools, or nylon. Immerse your fabric pieces in warm water first, and then place in your dye baths. Now, you can keep your fabric in the dye for as long as you would like, depending of the color / effect you are going for. For example, I left all three of mine in for about 7-10 minutes each. It ended up being perfect for the rock bound fabric, since I was going for more of a pink color than a deep red. But I wish I would’ve left my pole-wrapped fabric in for longer, since the majority turned out pretty light.

shibori7

When it is time to remove your fabric from the dye, rinse in cold water. Remove your twine/rubber bands and rocks, etc. and continue to rinse until the water runs clear. Afterwards, make sure to wash (by hand or machine) in warm water with a little detergent, too, to eliminate all color running. let dry. 

Ta-daaaaaa, you finished your shibori!

Check back tomorrow to see what I made with my first of three new fabrics. It’s pretty awesome, if I do say so myself. 

DIY SIMPLE KNIT BODYCON SKIRT

knitskirt1

I’ve made a few of these quick knit skirts over the past few years. And by quick, I really mean quick - I whipped this one up in about 20 minutes. BAM. Now, there are a few different ways you can go about making one of these, depending on how detailed and precise you want to be. But I thought I’d show you one of the simplest and quickest ways I know. It only involves two rectangular pieces of fabric. No need to worry about getting the exact waist to hip curve, since the stretchy knit fabric will just conform to your body. 

Thats it. Two rectangles. Just a few seams. And you have yourself a skirt. read on after the jump to find out how. 

supplies:

- very stretchy knit fabric. how much depends on how long you want your skirt. But definitely less than 1 yard. 

- sewing machine and/or serger (optional)

- measuring tape and ruler

- tailors chalk / fabric pencil

- scissors, pins, thread, etc

knitskirt2
knitskirt3

1. Using your tape measure, measure around the smallest part of your waist, or where you want your skirt to sit. Don’t suck it in or pull too tight on the measuring tape. Make sure you get a nice, natural measurement. Also, measure and determine your desired length. 

Fold your knit fabric in half. Using tailors chalk or a fabric pencil, draw your two rectangular skirt pieces up against the folded edge, according to the diagram above. Cut out your two pieces. 

knitskirt4

2. Using a zig zag stitch on your regular machine, or a serger, sew along the edge opposite the fold on both pieces. Use about 5/8” seam allowance. This is going to be your center back seam. (note - when working with knits, don’t use a regular straight stitch. If you don’t have access to a serger, always use a zig zag stitch. It allows for a lot more stretch). 

3. Fold your waistband piece over in half, wrong sides together. So to seam allowance will be hidden inside. Mark the waistband into quarters - starting with the center back line, directly half of that is center front, and half way between those two points will be your sides. Mark with pins. 

4. Mark the same four points on your skirt piece. 

knitskirt5

5. With right sides together, pin your waistband to your skirt piece, matching up the four points. The skirt will be slightly larger than the waistband. 

Sew together using a zig zag or serger stitch. Stretch the skirt layer slightly in between your four points while sewing so that it lines up with the waistband. 

6. Now just finish off your hem. Fold under the amount you left for hem allowance. The best way to sew your hem would be with a double needle. If you don’t have a double needle, again use a zig zag stitch. NOT a straight stitch. 

knitskirt6

All done!! Slip that baby on, and let me know if you have any questions. 

image

DIY : CAT EYE MASK

catmask1

I started this DIY earlier this week and was super excited about it….. and then that same day, A Beautiful Mess posted their own eye mask DIY. Bollocks. Why are they always so good? But whatever, mine has cat ears. So I’m sticking to it.  Read on after the jump to see how I made my version!

supplies:

- front fabric

- back fabric (this will be up against your face. so the softer and silkier, the better.)

-felt or batting (the darker the better. remember, this is to help block out light!)

- elastic

-scissors, pins, needle and thread, and access to a sewing machine

catmask2

1. You’ll need a pattern for your eye mask. If you have an old one on hand, you could simply trace it, add the ears, and then add 1/2” seam allowance around the entire thing. Or you can draw one from scratch. It’s not hard, since it’s a pretty simple shape. I provided aprox. measurements above. It includes the seam allowance. 

catmask3
catmask4

2. Use your pattern to cut out your pieces out of all three fabrics. 

3. Also cut a piece of elastic aprox. 13 1/2” long. 

catmask5
catmask6

4. Place your front and back fabrics right side together, with the elastic sandwiched in between. Place this on top of your felt. 

5. Pin all layers in place, making sure to pin the elastic securely on both sides. The rest of the elastic will be tucked in and sandwiched in between the fabrics. 

catmask7
catmask8

6. Sew 1/2” from the edge, leaving a small opening. Don’t forget to backstitch at the beginning and end. 

7. Make triangular notches around the rounded edges, clipping as close you can (but not through) the stitching. Clip in the bottom middle, as well as the inner corners of the ears. And then trim the seam allowance in half around the entire mask. 

catmask9
catmask10

8. Flip right side out through the hole that you left. Use a point turner/tweezers/whatever you have handy to get those ears nice and pointy.

9. Using an invisible stitch, hand stitch that opening closed. Smooth and press. 

catmask11

That’s it! It’s super easy, right? I had it completely done in under an hour, at most. And now I’ll be sleeping’ pretty :)